<?xml version="1.0" encoding="utf-8"?>
<feed xmlns="http://www.w3.org/2005/Atom">
  <title>rythgs.co</title>
  
  
  <link href="https://rythgs.co/atom.xml" rel="self"/>
  
  <link href="https://rythgs.co/"/>
  <updated>2022-09-02T09:33:10.723Z</updated>
  <id>https://rythgs.co/</id>
  
  <author>
    <name>rythgs</name>
    
  </author>
  
  <generator uri="https://hexo.io/">Hexo</generator>
  
  <entry>
    <title>SugarCRM - ロジックフックまとめ</title>
    <link href="https://rythgs.co/archives/2018/11/14/sugarcrm-logichooks/"/>
    <id>https://rythgs.co/archives/2018/11/14/sugarcrm-logichooks/</id>
    <published>2018-11-14T14:10:14.000Z</published>
    <updated>2022-09-02T09:33:10.723Z</updated>
    
    <content type="html"><![CDATA[<p>SugarCRM v7以降ロジックフックが増えている（合計41個ある）ので一度整理してみる。<br>一応カテゴリ分けをしているがざっくりしたものなので参考程度に考えてほしい。</p><p>リンクは<a href="http://support.sugarcrm.com/Documentation/Sugar_Developer/Sugar_Developer_Guide_8.0/Architecture/Logic_Hooks/">公式のドキュメント</a>へのリンクだがドキュメントが用意されていないHookもあるのであしからず。</p><h2 id="認証系"><a href="#認証系" class="headerlink" title="認証系"></a>認証系</h2><p>システムにログイン・ログアウトしたときに呼ばれるHook。<br>Sidecar化した今OAuth APIへのアクセスが主な使われどころ。</p><h3 id="before-login"><a href="#before-login" class="headerlink" title="before_login"></a>before_login</h3><p>認証する前に呼ばれる。</p><h3 id="after-login"><a href="#after-login" class="headerlink" title="after_login"></a><a href="http://support.sugarcrm.com/Documentation/Sugar_Developer/Sugar_Developer_Guide_8.0/Architecture/Logic_Hooks/User_Hooks/after_login/">after_login</a></h3><p>認証後に呼ばれる。</p><h3 id="login-failed"><a href="#login-failed" class="headerlink" title="login_failed"></a><a href="http://support.sugarcrm.com/Documentation/Sugar_Developer/Sugar_Developer_Guide_8.0/Architecture/Logic_Hooks/User_Hooks/login_failed/">login_failed</a></h3><p>認証が失敗したときに呼ばれる。</p><h3 id="before-logout"><a href="#before-logout" class="headerlink" title="before_logout"></a><a href="http://support.sugarcrm.com/Documentation/Sugar_Developer/Sugar_Developer_Guide_8.0/Architecture/Logic_Hooks/User_Hooks/before_logout/">before_logout</a></h3><p>ログアウト処理の前に呼ばれる。</p><h3 id="after-logout"><a href="#after-logout" class="headerlink" title="after_logout"></a><a href="http://support.sugarcrm.com/Documentation/Sugar_Developer/Sugar_Developer_Guide_8.0/Architecture/Logic_Hooks/User_Hooks/after_logout/">after_logout</a></h3><p>ログアウト処理の後に呼ばれる。</p><h2 id="REST-API系"><a href="#REST-API系" class="headerlink" title="REST API系"></a>REST API系</h2><p>REST APIにアクセスしたときに呼ばれるHookたち。<br>Sugar v7から実装されたHookである。</p><h3 id="before-routing"><a href="#before-routing" class="headerlink" title="before_routing"></a><a href="http://support.sugarcrm.com/Documentation/Sugar_Developer/Sugar_Developer_Guide_8.0/Architecture/Logic_Hooks/API_Hooks/before_routing/">before_routing</a></h3><p>REST APIのルーティング判定前に呼ばれる。<br>使い所はなさげ。</p><h3 id="after-routing"><a href="#after-routing" class="headerlink" title="after_routing"></a><a href="http://support.sugarcrm.com/Documentation/Sugar_Developer/Sugar_Developer_Guide_8.0/Architecture/Logic_Hooks/API_Hooks/after_routing/">after_routing</a></h3><p>REST APIのルーティング判定後に呼ばれる。<br>こちらも使い所はなさげ。</p><h3 id="before-api-call"><a href="#before-api-call" class="headerlink" title="before_api_call"></a><a href="http://support.sugarcrm.com/Documentation/Sugar_Developer/Sugar_Developer_Guide_8.0/Architecture/Logic_Hooks/API_Hooks/before_api_call/">before_api_call</a></h3><p>ルーティング処理が終わり、APIクラスがロードされる前に呼ばれる。<br>これも使い所はなさげ。ロギングくらい？</p><h3 id="before-respond"><a href="#before-respond" class="headerlink" title="before_respond"></a><a href="http://support.sugarcrm.com/Documentation/Sugar_Developer/Sugar_Developer_Guide_8.0/Architecture/Logic_Hooks/API_Hooks/before_respond/">before_respond</a></h3><p>クライアントにAPI実行結果を返す直前に呼ばれる。<br>HttpResponseのインスタンスが渡されるためレスポンスヘッダーに情報を付与したり消したりで使えそう。</p><h3 id="before-filter"><a href="#before-filter" class="headerlink" title="before_filter"></a><a href="http://support.sugarcrm.com/Documentation/Sugar_Developer/Sugar_Developer_Guide_8.0/Architecture/Logic_Hooks/API_Hooks/before_filter/">before_filter</a></h3><p>Filter APIのクエリ実行前に呼ばれる。<br>SugarQueryインスタンスとクエリオプションが渡されるため検索クエリに手を加えたいときに使えそう。</p><h2 id="Bean系"><a href="#Bean系" class="headerlink" title="Bean系"></a>Bean系</h2><p>Sugarのカスタマイズで一番使うのがこれらのBean系のHookだと思う。<br>Sugarのバックエンドのカスタマイズでここを抑えておけばなんとかなるといっても過言ではない。  </p><p>モデルに近いHookなのでSidecar、BWC共に呼ばれる。</p><h3 id="before-fetch-query"><a href="#before-fetch-query" class="headerlink" title="before_fetch_query"></a><a href="http://support.sugarcrm.com/Documentation/Sugar_Developer/Sugar_Developer_Guide_8.0/Architecture/Logic_Hooks/Module_Hooks/before_fetch_query/">before_fetch_query</a></h3><p>ListViewやSubpanelなどリストデータを取得するクエリの実行直前に呼ばれる。<br>SugarQueryインスタンスとselectするフィールドが渡されるがあまり使い所がなさそう。</p><h3 id="after-fetch-query"><a href="#after-fetch-query" class="headerlink" title="after_fetch_query"></a><a href="http://support.sugarcrm.com/Documentation/Sugar_Developer/Sugar_Developer_Guide_8.0/Architecture/Logic_Hooks/Module_Hooks/after_fetch_query/">after_fetch_query</a></h3><p>ListViewやSubpanelなどリストデータ取得クエリの実行後に呼ばれる。<br>取得したデータのBean配列、DBから取得した生のデータが渡されるため、データ整形はここで。</p><h3 id="before-save"><a href="#before-save" class="headerlink" title="before_save"></a><a href="http://support.sugarcrm.com/Documentation/Sugar_Developer/Sugar_Developer_Guide_8.0/Architecture/Logic_Hooks/Module_Hooks/before_save/">before_save</a></h3><p>最もよく使うHook。<br>保存前にモデルを操作したり値を判定したり。</p><h3 id="after-save"><a href="#after-save" class="headerlink" title="after_save"></a><a href="http://support.sugarcrm.com/Documentation/Sugar_Developer/Sugar_Developer_Guide_8.0/Architecture/Logic_Hooks/Module_Hooks/after_save/">after_save</a></h3><p>最もよく使うHook。その2。<br>保存後に子のモデルを更新したり自モデルに関連したモデルを操作することが多い。</p><h3 id="before-retrieve"><a href="#before-retrieve" class="headerlink" title="before_retrieve"></a>before_retrieve</h3><p><code>BeanFactory::getBean()</code>の処理前に呼ばれる。<br>リストではなく単一モデルが対象となる。つまりRecordView（DetailView、EditView）に関連する。</p><h3 id="after-retrieve"><a href="#after-retrieve" class="headerlink" title="after_retrieve"></a><a href="http://support.sugarcrm.com/Documentation/Sugar_Developer/Sugar_Developer_Guide_8.0/Architecture/Logic_Hooks/Module_Hooks/after_retrieve/">after_retrieve</a></h3><p><code>BeanFactory::getBean()</code>の処理後に呼ばれる。<br>モデルのデータを整えたりするのがここ。</p><h3 id="process-record"><a href="#process-record" class="headerlink" title="process_record"></a><a href="http://support.sugarcrm.com/Documentation/Sugar_Developer/Sugar_Developer_Guide_8.0/Architecture/Logic_Hooks/Module_Hooks/process_record/">process_record</a></h3><p>ListViewのデータを処理するときに呼ばれる。<br>一覧データの整形などはこちら。</p><h3 id="before-delete"><a href="#before-delete" class="headerlink" title="before_delete"></a><a href="http://support.sugarcrm.com/Documentation/Sugar_Developer/Sugar_Developer_Guide_8.0/Architecture/Logic_Hooks/Module_Hooks/before_delete/">before_delete</a></h3><p>モデルの削除前に呼ばれる。</p><h3 id="after-delete"><a href="#after-delete" class="headerlink" title="after_delete"></a><a href="http://support.sugarcrm.com/Documentation/Sugar_Developer/Sugar_Developer_Guide_8.0/Architecture/Logic_Hooks/Module_Hooks/after_delete/">after_delete</a></h3><p>モデルの削除後に呼ばれる。<br>紐づくデータの掃除などはここ。</p><h3 id="before-restore"><a href="#before-restore" class="headerlink" title="before_restore"></a><a href="http://support.sugarcrm.com/Documentation/Sugar_Developer/Sugar_Developer_Guide_8.0/Architecture/Logic_Hooks/Module_Hooks/before_restore/">before_restore</a></h3><p>削除したデータを復活させたときに呼ばれる。<br>未使用。</p><h3 id="after-restore"><a href="#after-restore" class="headerlink" title="after_restore"></a><a href="http://support.sugarcrm.com/Documentation/Sugar_Developer/Sugar_Developer_Guide_8.0/Architecture/Logic_Hooks/Module_Hooks/after_restore/">after_restore</a></h3><p>同上。</p><h2 id="リレーションシップ系"><a href="#リレーションシップ系" class="headerlink" title="リレーションシップ系"></a>リレーションシップ系</h2><p>モジュールデータのリレーションシップが操作されたときに呼ばれるHookたち。<br>「データの紐付きが解除されたら〇〇したい」など結構使い所があるHookである。こちらもモデルに近いHookなのでSidecar、BWC共に呼ばれる。</p><h3 id="before-relationship-add"><a href="#before-relationship-add" class="headerlink" title="before_relationship_add"></a><a href="http://support.sugarcrm.com/Documentation/Sugar_Developer/Sugar_Developer_Guide_8.0/Architecture/Logic_Hooks/Module_Hooks/before_relationship_add/">before_relationship_add</a></h3><p>データの紐付け前に呼ばれる。<br>サブパネルでデータを関連付けたときに親のデータを子に書くなど特定の処理を行いたいときに。</p><h3 id="after-relationship-add"><a href="#after-relationship-add" class="headerlink" title="after_relationship_add"></a><a href="http://support.sugarcrm.com/Documentation/Sugar_Developer/Sugar_Developer_Guide_8.0/Architecture/Logic_Hooks/Module_Hooks/after_relationship_add/">after_relationship_add</a></h3><p>データの紐づけ後に呼ばれる。</p><h3 id="before-relationship-update"><a href="#before-relationship-update" class="headerlink" title="before_relationship_update"></a>before_relationship_update</h3><p>データの紐づけ更新前に呼ばれる。</p><h3 id="after-relationship-update"><a href="#after-relationship-update" class="headerlink" title="after_relationship_update"></a>after_relationship_update</h3><p>データの紐づけ更新後に呼ばれる。</p><h3 id="before-relationship-delete"><a href="#before-relationship-delete" class="headerlink" title="before_relationship_delete"></a><a href="http://support.sugarcrm.com/Documentation/Sugar_Developer/Sugar_Developer_Guide_8.0/Architecture/Logic_Hooks/Module_Hooks/before_relationship_delete/">before_relationship_delete</a></h3><p>データの紐づけを削除する前に呼ばれる。</p><h3 id="after-relationship-delete"><a href="#after-relationship-delete" class="headerlink" title="after_relationship_delete"></a><a href="http://support.sugarcrm.com/Documentation/Sugar_Developer/Sugar_Developer_Guide_8.0/Architecture/Logic_Hooks/Module_Hooks/after_relationship_delete/">after_relationship_delete</a></h3><p>データの紐づけを削除した後に呼ばれる。</p><h2 id="View系"><a href="#View系" class="headerlink" title="View系"></a>View系</h2><p>これらはSugarViewで処理されるBWCのみで有効なHook。<br>レガシーシステムでは使用しているところもあるだろうがほぼ使わなくなったHookである。実際 v7.10 で<code>Deprecated</code>となった。</p><h3 id="after-ui-frame"><a href="#after-ui-frame" class="headerlink" title="after_ui_frame"></a><a href="http://support.sugarcrm.com/Documentation/Sugar_Developer/Sugar_Developer_Guide_8.0/Architecture/Logic_Hooks/Application_Hooks/after_ui_frame/">after_ui_frame</a></h3><p>SugarViewのdisplay処理の後に呼ばれる。<br>画面に追加のViewを流し込みたいときなど。</p><h3 id="after-ui-footer"><a href="#after-ui-footer" class="headerlink" title="after_ui_footer"></a><a href="http://support.sugarcrm.com/Documentation/Sugar_Developer/Sugar_Developer_Guide_8.0/Architecture/Logic_Hooks/Application_Hooks/after_ui_footer/">after_ui_footer</a></h3><p>SugarViewのdisplay処理の最後に呼ばれる。</p><h2 id="アプリケーション系"><a href="#アプリケーション系" class="headerlink" title="アプリケーション系"></a>アプリケーション系</h2><h3 id="after-entry-point"><a href="#after-entry-point" class="headerlink" title="after_entry_point"></a><a href="http://support.sugarcrm.com/Documentation/Sugar_Developer/Sugar_Developer_Guide_8.0/Architecture/Logic_Hooks/Application_Hooks/after_entry_point/">after_entry_point</a></h3><p>Sugarの動作に必要なプログラム、設定値の読み込み、ログ、DBの初期化を行ったあとに呼ばれる。<br>使いみちがありそうでないHook。</p><h3 id="after-load-user"><a href="#after-load-user" class="headerlink" title="after_load_user"></a><a href="http://support.sugarcrm.com/Documentation/Sugar_Developer/Sugar_Developer_Guide_8.0/Architecture/Logic_Hooks/Application_Hooks/after_load_user/">after_load_user</a></h3><p>Sugarの<code>$currentUser</code>をロードした後に呼ばれる。<br>ログインユーザーの情報でなんやかんやするときに使う。</p><h3 id="after-session-start"><a href="#after-session-start" class="headerlink" title="after_session_start"></a><a href="http://support.sugarcrm.com/Documentation/Sugar_Developer/Sugar_Developer_Guide_8.0/Architecture/Logic_Hooks/Application_Hooks/after_session_start/">after_session_start</a></h3><p>セッションスタートの後に呼ばれる。</p><h3 id="entry-point-variables-setting"><a href="#entry-point-variables-setting" class="headerlink" title="entry_point_variables_setting"></a><a href="http://support.sugarcrm.com/Documentation/Sugar_Developer/Sugar_Developer_Guide_8.0/Architecture/Logic_Hooks/Application_Hooks/entry_point_variables_setting/">entry_point_variables_setting</a></h3><p>Sugarの動作に必要なプログラム、設定値の読み込みが完了し、初期化を実行する前に呼ばれる。<br>v6.5にはなかったような。。</p><h3 id="handle-exception"><a href="#handle-exception" class="headerlink" title="handle_exception"></a><a href="http://support.sugarcrm.com/Documentation/Sugar_Developer/Sugar_Developer_Guide_8.0/Architecture/Logic_Hooks/Application_Hooks/handle_exception/">handle_exception</a></h3><p>その名の通り例外が発生したときに呼ばれる。<br>もちろんハンドリングしている例外のみだし、BWCなどのレガシーシステムの方はふわっとした実装になっているため必ず呼ばれるわけではないことに注意。</p><h3 id="server-round-trip"><a href="#server-round-trip" class="headerlink" title="server_round_trip"></a><a href="http://support.sugarcrm.com/Documentation/Sugar_Developer/Sugar_Developer_Guide_8.0/Architecture/Logic_Hooks/Application_Hooks/server_round_trip/">server_round_trip</a></h3><p><code>sugar_cleanup()</code>が実行されたときに呼ばれる。<br>ドキュメントには<code>Executes at the end of every page.</code>と書かれてある。。</p><h3 id="process-report-row"><a href="#process-report-row" class="headerlink" title="process_report_row"></a>process_report_row</h3><p>レポートのデータを1行ずつ処理するときに呼ばれる。<br>らしいが試してみた感じうまく動いていない。</p><h3 id="before-email-import"><a href="#before-email-import" class="headerlink" title="before_email_import"></a><a href="http://support.sugarcrm.com/Documentation/Sugar_Developer/Sugar_Developer_Guide_8.0/Architecture/Logic_Hooks/SNIP_Hooks/before_email_import/">before_email_import</a></h3><p>SugarSNIPのメールインポート処理で呼ばれる。<br>未使用。</p><h3 id="after-email-import"><a href="#after-email-import" class="headerlink" title="after_email_import"></a><a href="http://support.sugarcrm.com/Documentation/Sugar_Developer/Sugar_Developer_Guide_8.0/Architecture/Logic_Hooks/SNIP_Hooks/after_email_import/">after_email_import</a></h3><p>同上。</p><h3 id="after-retrieve-elastic"><a href="#after-retrieve-elastic" class="headerlink" title="after_retrieve_elastic"></a>after_retrieve_elastic</h3><p>ElasticSearchデータをハンドリングする際のSugarBean取得後に呼ばれる。<br>未使用。</p><h2 id="スケジューラージョブ系"><a href="#スケジューラージョブ系" class="headerlink" title="スケジューラージョブ系"></a>スケジューラージョブ系</h2><h3 id="job-failure"><a href="#job-failure" class="headerlink" title="job_failure"></a><a href="http://support.sugarcrm.com/Documentation/Sugar_Developer/Sugar_Developer_Guide_8.0/Architecture/Logic_Hooks/Job_Queue_Hooks/job_failure/">job_failure</a></h3><p>スケジューラのJobが失敗したときに呼ばれる。</p><h3 id="job-failure-retry"><a href="#job-failure-retry" class="headerlink" title="job_failure_retry"></a><a href="http://support.sugarcrm.com/Documentation/Sugar_Developer/Sugar_Developer_Guide_8.0/Architecture/Logic_Hooks/Job_Queue_Hooks/job_failure_retry/">job_failure_retry</a></h3><p>スケジューラのJobが失敗してリトライ処理を行ったときに呼ばれる。</p><hr><p>実際に本番で使用するのは多くて5つくらいかなぁ。経験上<code>before_save</code>, <code>after_save</code>を知っておけば大体なんとかなるっぽい。次はSidecarの隠しパラメータをまとめてみたい。こちらの方が実用的だがドキュメントに載っていないものが多いのでまとめ甲斐があるでしょう。</p>]]></content>


    <summary type="html">&lt;p&gt;SugarCRM v7以降ロジックフックが増えている（合計41個ある）ので一度整理してみる。&lt;br&gt;一応カテゴリ分けをしているがざっくりしたものなので参考程度に考えてほしい。&lt;/p&gt;
&lt;p&gt;リンクは&lt;a href=&quot;http://support.sugarcrm.com/D</summary>


    <category term="sugarcrm" scheme="https://rythgs.co/tags/sugarcrm/"/>
    
  </entry>
  
  <entry>
    <title>LoopBackのプラグインと設定</title>
    <link href="https://rythgs.co/archives/2017/11/20/loopback-memo/"/>
    <id>https://rythgs.co/archives/2017/11/20/loopback-memo/</id>
    <published>2017-11-20T11:23:12.000Z</published>
    <updated>2022-09-02T09:33:10.723Z</updated>
    
    <content type="html"><![CDATA[<p>バックエンドに<a href="https://loopback.io/">LoopBack</a>をということで、実践投入時には割と必要になるであろうプラグインや設定をメモしておく。</p><h2 id="作成日、更新日を自動セット"><a href="#作成日、更新日を自動セット" class="headerlink" title="作成日、更新日を自動セット"></a>作成日、更新日を自動セット</h2><ul><li><a href="https://github.com/clarkbw/loopback-ds-timestamp-mixin">loopback-ds-timestamp-mixin</a></li></ul><h2 id="論理削除"><a href="#論理削除" class="headerlink" title="論理削除"></a>論理削除</h2><ul><li><a href="https://github.com/gausie/loopback-softdelete-mixin">loopback-softdelete-mixin</a></li></ul><h2 id="不要なAPIを削除"><a href="#不要なAPIを削除" class="headerlink" title="不要なAPIを削除"></a>不要なAPIを削除</h2><p>例えば、アクセストークンを取得するAPIの削除</p><figure class="highlight js"><table><tr><td class="code"><pre><span class="line"><span class="title class_">User</span>.<span class="title function_">disableRemoteMethodByName</span>(<span class="string">&#x27;prototype.__count__accessTokens&#x27;</span>);</span><br><span class="line"><span class="title class_">User</span>.<span class="title function_">disableRemoteMethodByName</span>(<span class="string">&#x27;prototype.__create__accessTokens&#x27;</span>);</span><br><span class="line"><span class="title class_">User</span>.<span class="title function_">disableRemoteMethodByName</span>(<span class="string">&#x27;prototype.__delete__accessTokens&#x27;</span>);</span><br><span class="line"><span class="title class_">User</span>.<span class="title function_">disableRemoteMethodByName</span>(<span class="string">&#x27;prototype.__destroyById__accessTokens&#x27;</span>);</span><br><span class="line"><span class="title class_">User</span>.<span class="title function_">disableRemoteMethodByName</span>(<span class="string">&#x27;prototype.__findById__accessTokens&#x27;</span>);</span><br><span class="line"><span class="title class_">User</span>.<span class="title function_">disableRemoteMethodByName</span>(<span class="string">&#x27;prototype.__get__accessTokens&#x27;</span>);</span><br><span class="line"><span class="title class_">User</span>.<span class="title function_">disableRemoteMethodByName</span>(<span class="string">&#x27;prototype.__updateById__accessTokens&#x27;</span>);</span><br></pre></td></tr></table></figure><p><a href="https://qiita.com/shimitei/items/7ed41944a330873c6b6f">https://qiita.com/shimitei/items/7ed41944a330873c6b6f</a></p><h2 id="idをuuidに変更する"><a href="#idをuuidに変更する" class="headerlink" title="idをuuidに変更する"></a>idをuuidに変更する</h2><p><a href="https://stackoverflow.com/questions/36633516/can-i-use-non-sequential-id-for-loopback-model">https://stackoverflow.com/questions/36633516/can-i-use-non-sequential-id-for-loopback-model</a></p><figure class="highlight json"><table><tr><td class="code"><pre><span class="line"><span class="attr">&quot;id&quot;</span><span class="punctuation">:</span> <span class="punctuation">&#123;</span></span><br><span class="line">  <span class="attr">&quot;type&quot;</span><span class="punctuation">:</span> <span class="string">&quot;string&quot;</span><span class="punctuation">,</span></span><br><span class="line">  <span class="attr">&quot;id&quot;</span><span class="punctuation">:</span> <span class="literal"><span class="keyword">true</span></span><span class="punctuation">,</span></span><br><span class="line">  <span class="attr">&quot;defaultFn&quot;</span><span class="punctuation">:</span> <span class="string">&quot;guid&quot;</span></span><br><span class="line"><span class="punctuation">&#125;</span></span><br></pre></td></tr></table></figure><h2 id="SSL対応"><a href="#SSL対応" class="headerlink" title="SSL対応"></a>SSL対応</h2><ul><li><a href="https://github.com/yantrashala/loopback-ssl">loopback-ssl</a></li></ul><h2 id="ログインユーザーの情報を取得しておく"><a href="#ログインユーザーの情報を取得しておく" class="headerlink" title="ログインユーザーの情報を取得しておく"></a>ログインユーザーの情報を取得しておく</h2><ul><li><a href="https://github.com/guanbo/loopback-component-currentuser">loopback-component-currentuser</a></li></ul><p>モデルが選べてカスタム条件も入れられるのでよさげ。<br>公式のドキュメントに載ってる実装の拡張。</p><ul><li><a href="https://loopback.io/doc/en/lb3/Using-current-context.html#use-a-custom-strong-remoting-phase">https://loopback.io/doc/en/lb3/Using-current-context.html#use-a-custom-strong-remoting-phase</a></li></ul><h2 id="プロセスマネージャー"><a href="#プロセスマネージャー" class="headerlink" title="プロセスマネージャー"></a>プロセスマネージャー</h2><p>pm2でも良いんだけど、せっかく純正のプロセスマネージャーがあるので使ってみる。</p><figure class="highlight plaintext"><table><tr><td class="code"><pre><span class="line">yarn global add strongloop</span><br><span class="line">cd app-dir</span><br><span class="line">slc start</span><br></pre></td></tr></table></figure><p>TODO: サーバー再起動時のプロセス自動起動の方法を確認する。</p><h2 id="チームセキュリティー"><a href="#チームセキュリティー" class="headerlink" title="チームセキュリティー"></a>チームセキュリティー</h2><p>ロールによるACLはデフォルトで実装されているけれど、チームによるアクセス制限を掛けたい場合。<br>例えば、「チームAに所属している人はチームAのデータのみ取得できるようにする」とか。</p><ul><li><a href="https://www.npmjs.com/package/loopback-component-access-groups">loopback-component-access-groups</a></li></ul><p>実装した後にこのプラグインの存在に気づいてショック！</p><hr><p>これで大体の土台は整えられると思う。<br>あとはOAuthやJWTなどの認証周りだろうか。</p>]]></content>


    <summary type="html">&lt;p&gt;バックエンドに&lt;a href=&quot;https://loopback.io/&quot;&gt;LoopBack&lt;/a&gt;をということで、実践投入時には割と必要になるであろうプラグインや設定をメモしておく。&lt;/p&gt;
&lt;h2 id=&quot;作成日、更新日を自動セット&quot;&gt;&lt;a href=&quot;#作成日、更新日</summary>


    <content src="https://rythgs.co/2017/loopback.png" type="image"/>


    <category term="plugin" scheme="https://rythgs.co/tags/plugin/"/>
    
    <category term="node" scheme="https://rythgs.co/tags/node/"/>
    
    <category term="loopback" scheme="https://rythgs.co/tags/loopback/"/>
    
  </entry>
  
  <entry>
    <title>SugarCRM - Sugar7の開発環境をDockerで作った</title>
    <link href="https://rythgs.co/archives/2017/10/18/sugar-docker/"/>
    <id>https://rythgs.co/archives/2017/10/18/sugar-docker/</id>
    <published>2017-10-18T12:39:42.000Z</published>
    <updated>2022-09-02T09:33:10.723Z</updated>
    
    <content type="html"><![CDATA[<p>複数案件のSugar7の開発をしているとPHPのバージョンを案件ごとに切り替えないといけなくて、まぁめんどくさいので会社のPCがWindows10になったのをキッカケにDockerでSugarの動作環境を整えられるようにした。</p><p><a href="https://github.com/rythgs/sugar-docker-example">https://github.com/rythgs/sugar-docker-example</a></p><p>もともと中の人が作ったものをforkしてロケールの設定や最新のSugarに対応出来るように修正。細かい違いはあれど、PHP7.1のSugar7.9以降とそれ以外だと思うのでブランチで分けられるようにしておいた。</p><p>今後ちょくちょくメンテしていくつもり。</p>]]></content>


    <summary type="html">&lt;p&gt;複数案件のSugar7の開発をしているとPHPのバージョンを案件ごとに切り替えないといけなくて、まぁめんどくさいので会社のPCがWindows10になったのをキッカケにDockerでSugarの動作環境を整えられるようにした。&lt;/p&gt;
&lt;p&gt;&lt;a href=&quot;https:/</summary>


    <content src="https://rythgs.co/2017/sugar-docker.png" type="image"/>


    <category term="sugarcrm" scheme="https://rythgs.co/tags/sugarcrm/"/>
    
    <category term="docker" scheme="https://rythgs.co/tags/docker/"/>
    
  </entry>
  
  <entry>
    <title>MacBook Proから変な音がするので修理に出した</title>
    <link href="https://rythgs.co/archives/2017/08/18/repair-my-macbookpro/"/>
    <id>https://rythgs.co/archives/2017/08/18/repair-my-macbookpro/</id>
    <published>2017-08-18T12:14:42.000Z</published>
    <updated>2022-09-02T09:33:10.723Z</updated>
    
    <content type="html"><![CDATA[<p>MacBook Pro(2016)を買って少し経ったころ、使用していると「パツンッ」という音が鳴るようになった。最初はあまり気にしていなかったのだけれど結構大きな音がするのでジーニアスに駆け込んで修理してもらった。</p><h2 id="症状"><a href="#症状" class="headerlink" title="症状"></a>症状</h2><p>MacBook Proを使ってしばらくしていると「パツンッ」とか「パキンッ」みたいな音(決して金属音ではない。どっちかというとプラスチック系の音)がキーボード上部(ロジックボードがある辺り)から鳴る。筐体が温まってきたくらいで鳴るのでヒートシンクとかの熱膨張が関係しているのかなと思っていたが、ディスプレイの角度を変えたときも似たような音が鳴る。</p><p>検索してみると結構報告されている模様。。</p><ul><li><a href="https://discussions.apple.com/thread/7825434?start=0&tstart=0">Popping Sound, MBP 2016 | Official Apple Support Communities</a></li><li><a href="http://applech2.com/archives/20170414-macbook-pro-late-2016-15inch-model-popping-issue.html">MacBook Pro 2016 15インチモデルで、高発熱時にポップノイズが出る問題が報告される。 | AAPL Ch.</a></li></ul><p>この動画が分かりやすい。</p><div class="video-container"><iframe src="https://www.youtube.com/embed/oST0bDjSjDw" frameborder="0" loading="lazy" allowfullscreen></iframe></div><p>突然大きな音が鳴るので心臓に悪い。動画では伝わらないかもしれないけど結構驚く。</p><h2 id="いざGenius-Barへ"><a href="#いざGenius-Barへ" class="headerlink" title="いざGenius Barへ"></a>いざGenius Barへ</h2><p>症状が発生してからだいぶ放置していたが重い腰を上げてジーニアスバーに行くことにした。それにしても、これをしたら100%再現するというのがないので再現するか心配だったのだが、ハードウェアチェックをかけているときに運良く音がなってくれた。ディスプレイの角度を変えたときも同様の音が鳴ることを伝え、バックヤードで確認を行なってもらうと確かに再現したらしくそのままリペアセンター行きとなった。</p><h2 id="修理されて戻ってきたMacBook-Pro"><a href="#修理されて戻ってきたMacBook-Pro" class="headerlink" title="修理されて戻ってきたMacBook Pro"></a>修理されて戻ってきたMacBook Pro</h2><p>土曜日の昼にジーニアスに行って、修理されて戻って来たのが水曜日の午前中。1週間から10日と聞かされていたので、なかなかに速い。<br>さて、不具合はどこだったのかというと、修理報告書にはディスプレイユニットを交換したという旨が記載されていた。</p><p>今のところは再発することもなく<strong>完全解消</strong>されている！ヽ(´▽｀)ノﾜｰｲ♪</p><p>そして、見た目的には大きく変わらないが、一つだけ明らかに変わったところがある。<br>それはディスプレイを閉じた状態から開くときの「感じ」で、修理前は「バコッ」と開く感じだったのが、修理後は「ヌルン」と開くようになっていた。多分現行ロットはヒンジ周りに何かしらの改善が施されたものに変更されているんだろうね。なので2017モデルで報告が少ない。</p><hr><p>今まで結構Apple製品使ってきたけど運良く不具合に当たらなくて、修理に出したのはMacBook Pro(2006)がGPUかロジックボードだかの交換プログラムの対象になったとき以来で知らなかったんだけど、今はアップルのクリアケースがつくんだね。ちょっと嬉しい。</p>]]></content>


    <summary type="html">&lt;p&gt;MacBook Pro(2016)を買って少し経ったころ、使用していると「パツンッ」という音が鳴るようになった。最初はあまり気にしていなかったのだけれど結構大きな音がするのでジーニアスに駆け込んで修理してもらった。&lt;/p&gt;
&lt;h2 id=&quot;症状&quot;&gt;&lt;a href=&quot;#症状&quot;</summary>


    <content src="https://rythgs.co/2017/mbp.jpg" type="image"/>


    <category term="macbookpro" scheme="https://rythgs.co/tags/macbookpro/"/>
    
    <category term="apple" scheme="https://rythgs.co/tags/apple/"/>
    
  </entry>
  
  <entry>
    <title>Netlifyに移行するついでにやったこと、ハマったこと</title>
    <link href="https://rythgs.co/archives/2017/08/04/things-one-has-done/"/>
    <id>https://rythgs.co/archives/2017/08/04/things-one-has-done/</id>
    <published>2017-08-04T14:24:45.000Z</published>
    <updated>2022-09-02T09:33:10.723Z</updated>
    
    <content type="html"><![CDATA[<p>ホスティング先を<a href="https://www.netlify.com/">Netlify</a>に変更するついでにやったこと、ハマったことまとめ。</p><h2 id="1-記事が前日のものとして公開される"><a href="#1-記事が前日のものとして公開される" class="headerlink" title="1.記事が前日のものとして公開される"></a>1.記事が前日のものとして公開される</h2><p>Netlifyが自動デプロイした記事のパーマリンクが1日前に設定されていることに気づいた。Markdownには<code>date: 2017-08-04</code>と記述しているが、デプロイされると</p><p><a href="http://rythgs.co/archives/2017/08/03/hogehoge/">http://rythgs.co/archives/2017/08/03/hogehoge/</a></p><p>上記のような1日前のパーマリンクになってしまう。ローカル環境で<code>hexo generate</code>すると大丈夫なので<code>hexo generate</code>したサーバーのtimezoneに依存するのだろう。おそらくUTCで-9時間してるんだよね。</p><p>解決法としては、すべてのMarkdownに時間まで設定してデプロイし直したらOKだった。(ex. <code>date: 2017-08-04 12:12:12</code>)</p><h2 id="2-webpack導入"><a href="#2-webpack導入" class="headerlink" title="2.webpack導入"></a>2.webpack導入</h2><p>モジュールをバンドルするのにgulp使っていたのをwebpackに移行した。<br>主な変更点は以下の通り。</p><ul><li>Hexoプラグインでやっていたminifyをバンドル時に実施</li><li>jQueryプラグイン系はすべてnpmで管理</li></ul><figure class="highlight plaintext"><table><tr><td class="code"><pre><span class="line">yarn add --dev webpack babel-core babel-loader babel-preset-es2015</span><br></pre></td></tr></table></figure><figure class="highlight javascript"><figcaption><span>webpack.config.js</span></figcaption><table><tr><td class="code"><pre><span class="line"><span class="keyword">const</span> webpack = <span class="built_in">require</span>(<span class="string">&#x27;webpack&#x27;</span>);</span><br><span class="line"></span><br><span class="line"><span class="keyword">const</span> path = &#123;</span><br><span class="line">  <span class="attr">src</span>: <span class="string">&#x27;./source/assets/js/_src&#x27;</span>,</span><br><span class="line">  <span class="attr">dist</span>: <span class="string">&#x27;./source/assets/js&#x27;</span>,</span><br><span class="line">&#125;;</span><br><span class="line"></span><br><span class="line"><span class="variable language_">module</span>.<span class="property">exports</span> = <span class="function"><span class="params">options</span> =&gt;</span> &#123;</span><br><span class="line">  <span class="keyword">return</span> &#123;</span><br><span class="line">    <span class="attr">entry</span>: <span class="string">`<span class="subst">$&#123;path.src&#125;</span>/main.js`</span>,</span><br><span class="line">    <span class="attr">output</span>: &#123;</span><br><span class="line">      <span class="attr">filename</span>: <span class="string">`<span class="subst">$&#123;path.dist&#125;</span>/bundle.js`</span>,</span><br><span class="line">    &#125;,</span><br><span class="line">    <span class="attr">plugins</span>: [</span><br><span class="line">      <span class="keyword">new</span> webpack.<span class="title class_">ProvidePlugin</span>(&#123;</span><br><span class="line">        <span class="attr">$</span>: <span class="string">&#x27;jquery&#x27;</span>,</span><br><span class="line">        <span class="attr">jQuery</span>: <span class="string">&#x27;jquery&#x27;</span>,</span><br><span class="line">      &#125;),</span><br><span class="line">      <span class="keyword">new</span> webpack.<span class="property">optimize</span>.<span class="title class_">UglifyJsPlugin</span>(&#123;</span><br><span class="line">        <span class="attr">sourceMap</span>: <span class="literal">false</span>,</span><br><span class="line">      &#125;),</span><br><span class="line">    ],</span><br><span class="line">    <span class="attr">module</span>: &#123;</span><br><span class="line">      <span class="attr">loaders</span>: [</span><br><span class="line">        &#123;</span><br><span class="line">          <span class="attr">test</span>: <span class="regexp">/\.js$/</span>,</span><br><span class="line">          <span class="attr">exclude</span>: <span class="regexp">/node_modules/</span>,</span><br><span class="line">          <span class="attr">loader</span>: <span class="string">&#x27;babel-loader&#x27;</span>,</span><br><span class="line">        &#125;,</span><br><span class="line">      ],</span><br><span class="line">    &#125;,</span><br><span class="line">    <span class="attr">resolve</span>: &#123;</span><br><span class="line">      <span class="attr">alias</span>: &#123;</span><br><span class="line">        <span class="attr">masonry</span>: <span class="string">&#x27;masonry-layout&#x27;</span>,</span><br><span class="line">        <span class="attr">isotope</span>: <span class="string">&#x27;isotope-layout&#x27;</span>,</span><br><span class="line">      &#125;,</span><br><span class="line">    &#125;,</span><br><span class="line">  &#125;;</span><br><span class="line">&#125;;</span><br></pre></td></tr></table></figure><h3 id="ハマったところ"><a href="#ハマったところ" class="headerlink" title="ハマったところ"></a>ハマったところ</h3><p>webpack実行しようとしたらisotope-layoutの名前解決ができねーよって怒られる。<br>どうやらresolve設定を書いてやる必要があるみたいで。</p><ul><li><a href="https://isotope.metafizzy.co/extras.html#webpack">https://isotope.metafizzy.co/extras.html#webpack</a></li></ul><p>jQueryプラグインとして使用するとエラーになったのでバニラで記述するようにした。</p><figure class="highlight js"><table><tr><td class="code"><pre><span class="line"><span class="keyword">const</span> isotope = <span class="keyword">new</span> <span class="title class_">Isotope</span>(<span class="string">&#x27;.hoge&#x27;</span>, &#123; <span class="comment">/* options */</span> &#125;);</span><br></pre></td></tr></table></figure><h2 id="3-Hexoプラグインの見直し"><a href="#3-Hexoプラグインの見直し" class="headerlink" title="3.Hexoプラグインの見直し"></a>3.Hexoプラグインの見直し</h2><p>Hexoで運用してしばらくたったのでプラグインを整理してみた。browsersyncやminify系プラグインを外したり。現在入れているプラグインは以下の通り。</p><h3 id="hexo-clean-css"><a href="#hexo-clean-css" class="headerlink" title="hexo-clean-css"></a><a href="https://github.com/hexojs/hexo-clean-css">hexo-clean-css</a></h3><p>CSSをminifyする。JavaScriptはwebpackで実施。</p><h3 id="hexo-html-minifier"><a href="#hexo-html-minifier" class="headerlink" title="hexo-html-minifier"></a><a href="https://github.com/hexojs/hexo-html-minifier">hexo-html-minifier</a></h3><p>HTMLをminifyする。</p><h3 id="hexo-generator-robotstxt"><a href="#hexo-generator-robotstxt" class="headerlink" title="hexo-generator-robotstxt"></a><a href="https://github.com/leecrossley/hexo-generator-robotstxt">hexo-generator-robotstxt</a></h3><p>robots.txtを生成する。</p><h3 id="hexo-generator-feed"><a href="#hexo-generator-feed" class="headerlink" title="hexo-generator-feed"></a><a href="https://github.com/hexojs/hexo-generator-feed">hexo-generator-feed</a></h3><p>Atomfeedの生成。</p><h3 id="hexo-generator-seo-friendly-sitemap"><a href="#hexo-generator-seo-friendly-sitemap" class="headerlink" title="hexo-generator-seo-friendly-sitemap"></a><a href="https://github.com/ludoviclefevre/hexo-generator-seo-friendly-sitemap">hexo-generator-seo-friendly-sitemap</a></h3><p>sitemap.xmlの生成。もう一つ<code>hexo-generator-sitemap</code>があるが、「seo friendly」と掲げているのでこちらを採用した。</p><h2 id="4-フォント設定を見直し"><a href="#4-フォント設定を見直し" class="headerlink" title="4.フォント設定を見直し"></a>4.フォント設定を見直し</h2><p>Note Sans Japaneseを読み込んでいたが、1.6MBと重たいので廃止した(サブセット化するまでもない)。それとカーニング設定を追加。</p><figure class="highlight stylus"><table><tr><td class="code"><pre><span class="line"><span class="attribute">letter-spacing</span>: .<span class="number">1em</span></span><br><span class="line"><span class="attribute">font-feature-settings</span>: <span class="string">&quot;palt&quot;</span> <span class="number">1</span></span><br><span class="line"><span class="attribute">font-kerning</span>: auto</span><br></pre></td></tr></table></figure><hr><p>以上、内部的なお話でした。</p>]]></content>


    <summary type="html">&lt;p&gt;ホスティング先を&lt;a href=&quot;https://www.netlify.com/&quot;&gt;Netlify&lt;/a&gt;に変更するついでにやったこと、ハマったことまとめ。&lt;/p&gt;
&lt;h2 id=&quot;1-記事が前日のものとして公開される&quot;&gt;&lt;a href=&quot;#1-記事が前日のものとして公開</summary>


    <content src="https://rythgs.co/2017/webpack-screenshot.png" type="image"/>


    <category term="plugin" scheme="https://rythgs.co/tags/plugin/"/>
    
    <category term="hexo" scheme="https://rythgs.co/tags/hexo/"/>
    
    <category term="webpack" scheme="https://rythgs.co/tags/webpack/"/>
    
  </entry>
  
  <entry>
    <title>Netlifyいい感じです</title>
    <link href="https://rythgs.co/archives/2017/08/03/hello-netlify/"/>
    <id>https://rythgs.co/archives/2017/08/03/hello-netlify/</id>
    <published>2017-08-03T08:35:26.000Z</published>
    <updated>2022-09-02T09:33:10.723Z</updated>
    
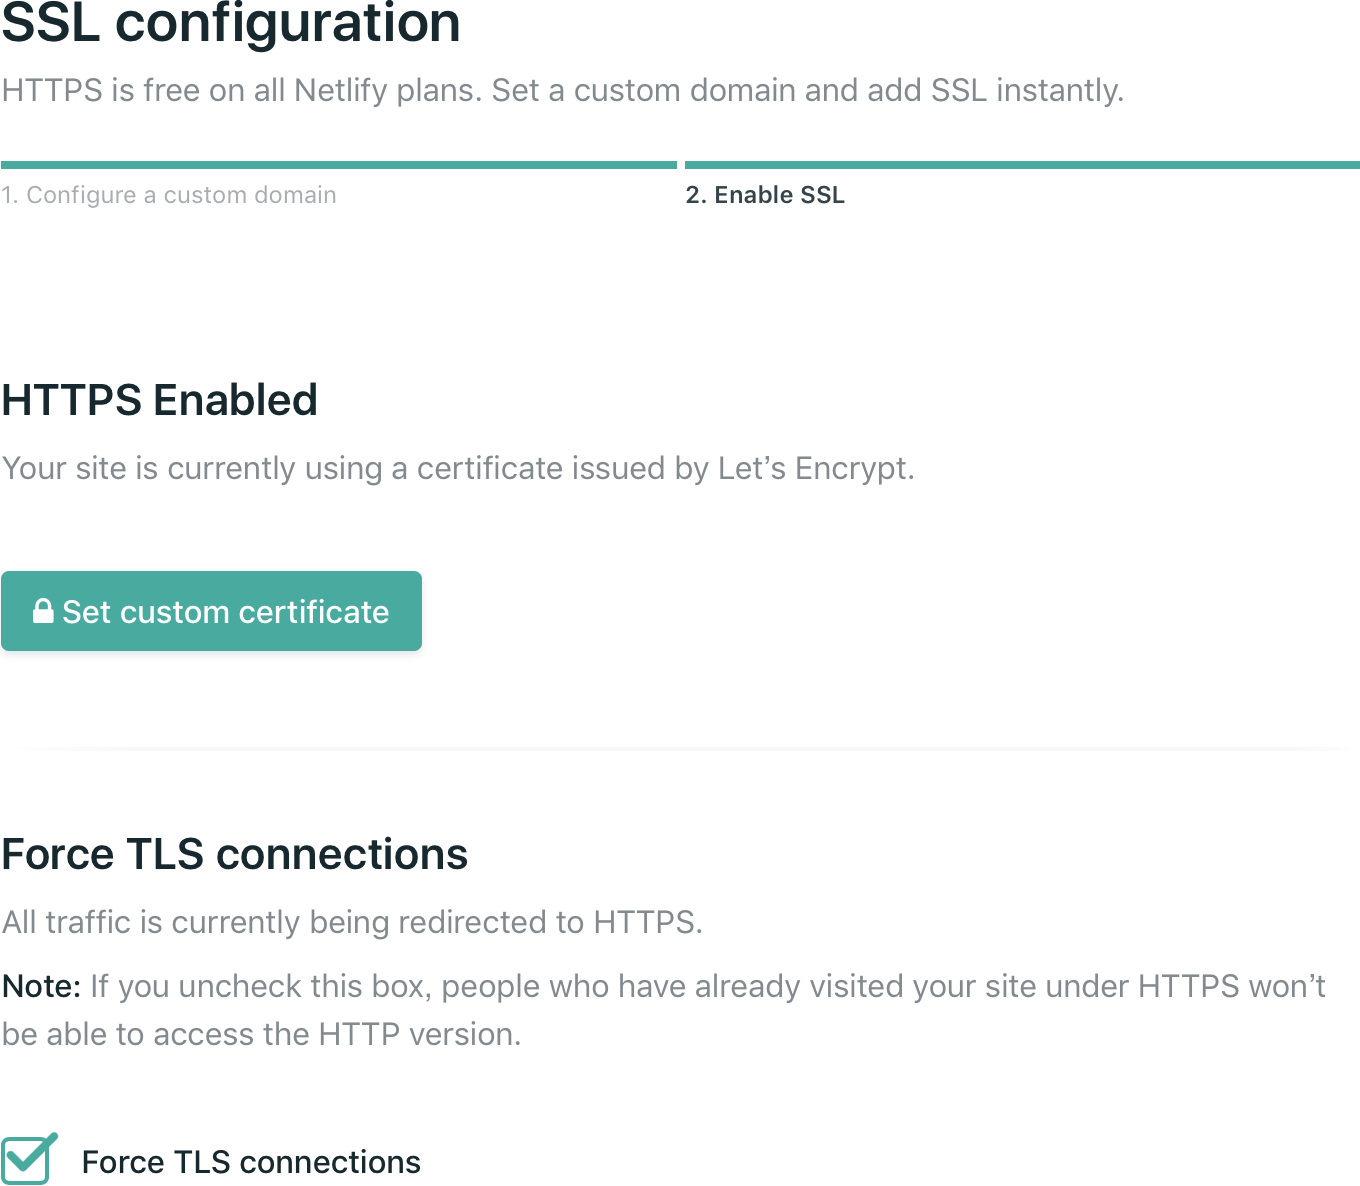
    <content type="html"><![CDATA[<p><a href="https://hexo.io/">Hexo</a>+<a href="https://pages.github.com/">GitHub Pages</a>+<a href="https://www.cloudflare.com/">Cloudflare</a>の構成を<a href="https://hexo.io/">Hexo</a>+<a href="https://www.netlify.com/">Netlify</a>に移行しました。</p><ul><li>リポジトリにプッシュするだけで</li><li>ビルドしてデプロイまでを自動化</li><li>CDNに対応し</li><li>カスタムドメインも使え</li><li>HTTPSに対応</li></ul><p>難しいことすることもなくGUIでポチッとするだけで設定が完了します。<br>詳細な設定は公式の手順が用意されているので問題なし。</p><ul><li><a href="https://www.netlify.com/blog/2015/10/26/a-step-by-step-guide-hexo-on-netlify/">A Step-by-Step Guide: Hexo on Netlify | Netlify</a></li></ul><h2 id="ハマったところ"><a href="#ハマったところ" class="headerlink" title="ハマったところ"></a>ハマったところ</h2><p><img src="/assets/img/2017/netlify_setting_https.png" alt="HTTPS 設定"></p><ul><li>テーマの方で管理していたnpmパッケージが有効にならない<br>→ まぁ当たり前で、ルートの方で管理するようにした</li><li>HTTPSの設定が浸透しない<br>→ <code>*.netlify.com</code>の証明書が浸透していたため一時的にサイトが見れない状態に<br>→ 一旦Netlifyのサイトを削除して再設定でOK<br>→ すぐさまLet’s Encryptの証明書が有効になった</li></ul>]]></content>


    <summary type="html">&lt;p&gt;&lt;a href=&quot;https://hexo.io/&quot;&gt;Hexo&lt;/a&gt;+&lt;a href=&quot;https://pages.github.com/&quot;&gt;GitHub Pages&lt;/a&gt;+&lt;a href=&quot;https://www.cloudflare.com/&quot;&gt;Cloudflare</summary>


    <content src="https://rythgs.co/2017/netlify.png" type="image"/>


    <category term="netlify" scheme="https://rythgs.co/tags/netlify/"/>
    
  </entry>
  
  <entry>
    <title>Hello Hexo. 静的サイドジェネレータをHexoに完全移行しました</title>
    <link href="https://rythgs.co/archives/2016/07/03/hello-hexo/"/>
    <id>https://rythgs.co/archives/2016/07/03/hello-hexo/</id>
    <published>2016-07-03T08:35:26.000Z</published>
    <updated>2022-09-02T09:33:10.723Z</updated>
    
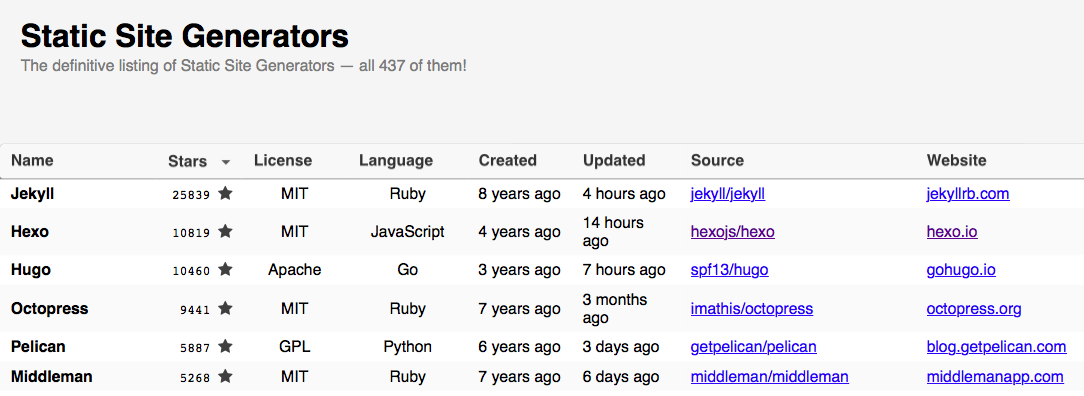
    <content type="html"><![CDATA[<p>いい加減<a href="https://middlemanapp.com/jp/">Middleman</a> v4系にアップデートしなければと思いつつ、他のジェネレータはないのかと<a href="https://staticsitegenerators.net/">Static Site Generators</a>を見てみると<a href="https://hexo.io/">Hexo</a>や<a href="https://gohugo.io/">Hugo</a>がキテるっぽい。どうせならすべてNode(JavaScript)で完結したいと思っていたので、このブログをHexoに完全移行することにした。</p><p><img src="/assets/img/2016/static-site-generators.png" alt="Static Site Generators"></p><h3 id="Hexoに移行するにあたって"><a href="#Hexoに移行するにあたって" class="headerlink" title="Hexoに移行するにあたって"></a>Hexoに移行するにあたって</h3><p>郷に行っては郷に従えということでデフォルトHexoに従いテンプレートエンジンとCSSは以下の通りに移行した。</p><table><thead><tr><th>Middleman</th><th>Hexo</th></tr></thead><tbody><tr><td>SASS</td><td>Stylus</td></tr><tr><td>Haml</td><td>EJS</td></tr></tbody></table><p>SASSはborbonを使っているので代替フレームワークは<a href="http://kouto-swiss.io/">kouto swiss</a>を採用。大体はそのまま移行できるが、<a href="http://kouto-swiss.io/docs.html#modular-scale">modular-scale</a>など細かいところで違いが見受けられたのでドキュメント見つつ修正を施した。ポイントは以下の通り。</p><ul><li>modular-scale</li><li>Stylus記法</li><li>Partialのimportはアンダーバーまで書く</li></ul><p>テーマの移行はHexo関係なくStylusとEJSを黙々と書けば良いので、以下ではHexoの仕様に合わせるところを主にあげたいと思う。</p><h2 id="リソースはどこで管理すべきか"><a href="#リソースはどこで管理すべきか" class="headerlink" title="リソースはどこで管理すべきか"></a>リソースはどこで管理すべきか</h2><p>画像の管理は<a href="https://hexo.io/docs/asset-folders.html">Asset Folders</a>という機能があるのでそれを使うと良いらしい。<br>が、記事ごとにディレクトリが生成されてウザいので<code>source/assets/img</code>の中で管理することに。デプロイした時には<code>source</code>がドキュメントルートになる。どうやらテーマの<code>source</code>も同じ構成にしておけば<code>hexo generate</code>した時にマージされて配置される。例えば、</p><ul><li>source&#x2F;assets&#x2F;img&#x2F;post-image.png</li><li>theme&#x2F;{theme-name}&#x2F;source&#x2F;assets&#x2F;img&#x2F;theme-image.png</li></ul><p>上の 2 つの画像は<code>hexo generate</code>すると以下のように配置される。</p><figure class="highlight plaintext"><table><tr><td class="code"><pre><span class="line">public/</span><br><span class="line">  assets/</span><br><span class="line">    img/</span><br><span class="line">      post-image.png</span><br><span class="line">      theme-image.png</span><br></pre></td></tr></table></figure><p>この動きは<code>source</code>ディレクトリ配下のすべてのファイルに適用される。</p><h2 id="Asset-Pipelineが欲しい"><a href="#Asset-Pipelineが欲しい" class="headerlink" title="Asset Pipelineが欲しい"></a>Asset Pipelineが欲しい</h2><p>MiddlemanにあってHexoにないもの、それはAsset PipelineってことでJavaScriptなどは自前で結合する必要がある（まぁしなくても良いけど）。この辺りは Gulpで自動化しつつ、jQueryなどのライブラリやプラグインはnpmで管理することにした。ついでにES2015で書きたいのでBabelを導入。</p><figure class="highlight plaintext"><table><tr><td class="code"><pre><span class="line">cd theme/rythgs</span><br><span class="line">npm install --save-dev gulp gulp-concat babel babel-preset-es2015 gulp-babel gulp-plumber</span><br></pre></td></tr></table></figure><p>ファイル結合してbabel通して保存する簡単な処理を書きます。</p><figure class="highlight js"><table><tr><td class="code"><pre><span class="line"><span class="keyword">var</span> gulp    = <span class="built_in">require</span>(<span class="string">&#x27;gulp&#x27;</span>),</span><br><span class="line">    concat  = <span class="built_in">require</span>(<span class="string">&#x27;gulp-concat&#x27;</span>),</span><br><span class="line">    babel   = <span class="built_in">require</span>(<span class="string">&#x27;gulp-babel&#x27;</span>),</span><br><span class="line">    plumber = <span class="built_in">require</span>(<span class="string">&#x27;gulp-plumber&#x27;</span>);</span><br><span class="line"></span><br><span class="line"><span class="keyword">var</span> config = &#123;</span><br><span class="line">  <span class="comment">// 結合したい JavaScript たち</span></span><br><span class="line">  <span class="attr">src</span>: [</span><br><span class="line">    <span class="string">&#x27;./node_modules/jquery/dist/jquery.min.js&#x27;</span>,</span><br><span class="line">    <span class="string">&#x27;./source/assets/js/_src/**/*.js&#x27;</span>,</span><br><span class="line">  ],</span><br><span class="line">  <span class="attr">dist</span>: <span class="string">&#x27;./source/assets/js/&#x27;</span></span><br><span class="line">&#125;;</span><br><span class="line"></span><br><span class="line">gulp.<span class="title function_">task</span>(<span class="string">&#x27;build&#x27;</span>, <span class="keyword">function</span>(<span class="params"></span>) &#123;</span><br><span class="line">  <span class="keyword">return</span> gulp.<span class="title function_">src</span>(config.<span class="property">src</span>)</span><br><span class="line">    .<span class="title function_">pipe</span>(<span class="title function_">plumber</span>())</span><br><span class="line">    .<span class="title function_">pipe</span>(<span class="title function_">concat</span>(<span class="string">&#x27;all.js&#x27;</span>))</span><br><span class="line">    .<span class="title function_">pipe</span>(<span class="title function_">babel</span>())</span><br><span class="line">    .<span class="title function_">pipe</span>(gulp.<span class="title function_">dest</span>(config.<span class="property">dist</span>));</span><br><span class="line">&#125;);</span><br><span class="line"></span><br><span class="line">gulp.<span class="title function_">task</span>(<span class="string">&#x27;watch&#x27;</span>, <span class="keyword">function</span>(<span class="params"></span>) &#123;</span><br><span class="line">  gulp.<span class="title function_">watch</span>(config.<span class="property">src</span>, [<span class="string">&#x27;build&#x27;</span>]);</span><br><span class="line">&#125;);</span><br><span class="line"></span><br><span class="line">gulp.<span class="title function_">task</span>(<span class="string">&#x27;default&#x27;</span>, [<span class="string">&#x27;watch&#x27;</span>]);</span><br></pre></td></tr></table></figure><p><code>package.json</code>からライブラリを自動で読み込みたいが、そこまでする量ではないのでベタ書き。テンプレートでは<code>all.js</code>のみを読み込むようにしておく。</p><figure class="highlight json"><figcaption><span>.babelrc</span></figcaption><table><tr><td class="code"><pre><span class="line"><span class="punctuation">&#123;</span></span><br><span class="line">  <span class="attr">&quot;presets&quot;</span><span class="punctuation">:</span> <span class="punctuation">[</span><span class="string">&quot;es2015&quot;</span><span class="punctuation">]</span><span class="punctuation">,</span></span><br><span class="line">  <span class="attr">&quot;compact&quot;</span><span class="punctuation">:</span> <span class="literal"><span class="keyword">false</span></span></span><br><span class="line"><span class="punctuation">&#125;</span></span><br></pre></td></tr></table></figure><p>ES2015 を使うので<code>.babelrc</code>に設定を書く。<br>自動で圧縮してくれるが圧縮は後述するプラグインに任せるのでオフっておく。</p><h2 id="プラグインで拡張する"><a href="#プラグインで拡張する" class="headerlink" title="プラグインで拡張する"></a>プラグインで拡張する</h2><p>必要なものは大体プラグインで用意されているのでnpmでインストールする。</p><h3 id="hexo-all-minifier"><a href="#hexo-all-minifier" class="headerlink" title="hexo-all-minifier"></a><a href="https://github.com/unhealthy/hexo-all-minifier">hexo-all-minifier</a></h3><p>html, css, js, imageを圧縮する。**<code>hexo server</code>の時も動作してしまう** ので<code>hexo generate</code>の時だけ有効化するのが良い。この辺り自動でやってくれるようにならないだろうか。</p><h3 id="hexo-browsersync"><a href="#hexo-browsersync" class="headerlink" title="hexo-browsersync"></a><a href="https://github.com/hexojs/hexo-browsersync">hexo-browsersync</a></h3><p>言わずもがな。自動リロード。<br>※これ使ってるとHTMLのお尻が文字化けするバグがある。</p><h3 id="hexo-deployer-git"><a href="#hexo-deployer-git" class="headerlink" title="hexo-deployer-git"></a><a href="https://github.com/hexojs/hexo-deployer-git">hexo-deployer-git</a></h3><p>GitHubにデプロイするのに必要。</p><h3 id="hexo-generator-feed"><a href="#hexo-generator-feed" class="headerlink" title="hexo-generator-feed"></a><a href="https://github.com/hexojs/hexo-generator-feed">hexo-generator-feed</a></h3><p><code>atom.xml</code>の出力。</p><h3 id="hexo-generator-sitemap"><a href="#hexo-generator-sitemap" class="headerlink" title="hexo-generator-sitemap"></a><a href="https://github.com/hexojs/hexo-generator-sitemap">hexo-generator-sitemap</a></h3><p><code>sitemap.xml</code>の出力。</p><hr><p>そんなわけでMiddlemanからHexoに完全移行し快適なブログ環境が整った。<br>Middlemanと違ってテーマが完全に分離できて一から作るのも楽。そして何と言ってもNodeで完結するようになったのが個人的に大きなポイントでございました。あ、コード表示がhighlight.jsでちょっとリッチになったのも嬉しい :-P</p>]]></content>


    <summary type="html">&lt;p&gt;いい加減&lt;a href=&quot;https://middlemanapp.com/jp/&quot;&gt;Middleman&lt;/a&gt; v4系にアップデートしなければと思いつつ、他のジェネレータはないのかと&lt;a href=&quot;https://staticsitegenerators.net/&quot;&gt;S</summary>


    <content src="https://rythgs.co/2016/hexo.png" type="image"/>


    <category term="javascript" scheme="https://rythgs.co/tags/javascript/"/>
    
    <category term="node" scheme="https://rythgs.co/tags/node/"/>
    
    <category term="hexo" scheme="https://rythgs.co/tags/hexo/"/>
    
    <category term="gulp" scheme="https://rythgs.co/tags/gulp/"/>
    
  </entry>
  
  <entry>
    <title>Sequelizeチップス</title>
    <link href="https://rythgs.co/archives/2016/05/24/sequelize-tips/"/>
    <id>https://rythgs.co/archives/2016/05/24/sequelize-tips/</id>
    <published>2016-05-24T07:23:22.000Z</published>
    <updated>2022-09-02T09:33:10.723Z</updated>
    
    <content type="html"><![CDATA[<p>Node案件でORMの<a href="http://docs.sequelizejs.com/en/latest/">Sequelize</a>を使用しました。<br><a href="http://docs.sequelizejs.com/en/latest/">公式のドキュメント</a>に書いてあったりなかったり、Sequelizeに関する備忘録を残します。</p><h2 id="1-Sequelizeで使用しているDBインスタンスを取得する"><a href="#1-Sequelizeで使用しているDBインスタンスを取得する" class="headerlink" title="1.Sequelizeで使用しているDBインスタンスを取得する"></a>1.Sequelizeで使用しているDBインスタンスを取得する</h2><p>ORMを通すよりは直接DBインスタンスからクエリ流した方が速いので、使用しているインスタンス取れないかなぁと思ってソース見たらメソッドが用意されておりました。</p><figure class="highlight js"><table><tr><td class="code"><pre><span class="line">sequelize.<span class="property">connectionManager</span>.<span class="title function_">getConnection</span>().<span class="title function_">then</span>(<span class="function">(<span class="params">db</span>) =&gt;</span> &#123;</span><br><span class="line">  db.<span class="title function_">get</span>(<span class="string">&#x27;SELECT name FROM hoge WHERE id = 1&#x27;</span>, <span class="function">(<span class="params">err, result</span>) =&gt;</span> &#123;</span><br><span class="line">    <span class="keyword">if</span> (err) &#123;</span><br><span class="line">      <span class="keyword">return</span>;</span><br><span class="line">    &#125;</span><br><span class="line">    <span class="variable language_">console</span>.<span class="title function_">log</span>(result.<span class="property">id</span>);</span><br><span class="line">  &#125;);</span><br><span class="line">&#125;);</span><br></pre></td></tr></table></figure><h3 id="ポイント"><a href="#ポイント" class="headerlink" title="ポイント"></a>ポイント</h3><ul><li><code>getConnection</code>するとPromiseが返る</li><li>コールバックの第1引数にDBインスタンスが入る</li><li>APIは各DBに依存する</li></ul><h2 id="2-Sequelizeでトランザクション管理"><a href="#2-Sequelizeでトランザクション管理" class="headerlink" title="2.Sequelizeでトランザクション管理"></a>2.Sequelizeでトランザクション管理</h2><p>複数モデルのupdateを1トランザクションで流して、全て実行した後Promiseの結果を受け取ります。<code>Promise.each</code>がキモ。Bluebird ありがとう。</p><figure class="highlight js"><table><tr><td class="code"><pre><span class="line">sequelize.<span class="title function_">transaction</span>(<span class="function">(<span class="params">t</span>) =&gt;</span> &#123;</span><br><span class="line">  <span class="keyword">return</span> sequelize.<span class="property">Promise</span>.<span class="title function_">each</span>(models, <span class="function">(<span class="params">model</span>) =&gt;</span> &#123;</span><br><span class="line">    <span class="keyword">return</span> model.<span class="title function_">update</span>(updates, &#123;<span class="attr">transaction</span>: t&#125;);</span><br><span class="line">  &#125;);</span><br><span class="line">&#125;).<span class="title function_">then</span>(<span class="function">(<span class="params">result</span>) =&gt;</span> &#123;</span><br><span class="line">  <span class="comment">// コミットしたらこっち</span></span><br><span class="line">&#125;).<span class="title function_">catch</span>(<span class="function">() =&gt;</span> &#123;</span><br><span class="line">  <span class="comment">// ロールバックしたらこっち</span></span><br><span class="line">&#125;);</span><br></pre></td></tr></table></figure><h2 id="3-エスケープ処理する"><a href="#3-エスケープ処理する" class="headerlink" title="3.エスケープ処理する"></a>3.エスケープ処理する</h2><p>1とも関係しますが、シビアにパフォーマンスが要求される場面でORMの機能は使わずクエリをそのまま流したかったのでエスケープ処理を入れる必要がありました。</p><figure class="highlight js"><table><tr><td class="code"><pre><span class="line">sequelize.<span class="built_in">escape</span>(req.<span class="property">params</span>.<span class="property">user_id</span>);</span><br></pre></td></tr></table></figure><hr><p>Sequelize意外と痒いところに手が届きます。<br>Promiseベースで記述できるのもGood :D</p><p>気づけば2016年最初の記事。。</p>]]></content>


    <summary type="html">&lt;p&gt;Node案件でORMの&lt;a href=&quot;http://docs.sequelizejs.com/en/latest/&quot;&gt;Sequelize&lt;/a&gt;を使用しました。&lt;br&gt;&lt;a href=&quot;http://docs.sequelizejs.com/en/latest/&quot;&gt;公式の</summary>


    <content src="https://rythgs.co/2016/sequelize.png" type="image"/>


    <category term="node" scheme="https://rythgs.co/tags/node/"/>
    
    <category term="sequelize" scheme="https://rythgs.co/tags/sequelize/"/>
    
  </entry>
  
  <entry>
    <title>ソースからインストールしたGitLabをOmnibusGitLabに移行しました</title>
    <link href="https://rythgs.co/archives/2015/10/31/switch-omnibus-gitlab/"/>
    <id>https://rythgs.co/archives/2015/10/31/switch-omnibus-gitlab/</id>
    <published>2015-10-31T07:23:22.000Z</published>
    <updated>2022-09-02T09:33:10.723Z</updated>
    
    <content type="html"><![CDATA[<p><a href="https://about.gitlab.com/">GitLab</a>はその昔、手動でRailsやらMySQLやらRedisやらUnicornやらの環境を整えてソースから手動でインストールしなければなりませんでした。しかし最近はパッケージ化され<code>apt-get</code>で簡単にインストールできるようになっております。これをOmnibus版と言うわけですが、開発チームもこのOmnibus版に移行することを強く薦めておりまして。この度、様々な事情もありソースからインストールした社内のGitLabをOmnibusGitLabへ移行したのでその手順を残しておきます。</p><p>今回は新しく用意したOmnibus GitLabに古いGitLabを完全移行させるという流れで実施しました。サーバーはUbuntu Server 14.04です。</p><ol><li>Omnibus GitLabをインストール</li><li>Omnibus GitLabの設定</li><li>Non-omnibus GitLabのバックアップ</li><li>DBダンプをMySQLからPostgreSQLに変換</li><li>バックアップデータをOmnibus GitLabにRestore</li></ol><h2 id="Omnibus-GitLabのインストール"><a href="#Omnibus-GitLabのインストール" class="headerlink" title="Omnibus GitLabのインストール"></a>Omnibus GitLabのインストール</h2><p>Omnibus版のインストールは恐ろしく簡単になってます。<br>公式の手順に沿って進めればすぐにインストール完了です。</p><p><a href="https://about.gitlab.com/downloads/#ubuntu1404">https://about.gitlab.com/downloads/#ubuntu1404</a></p><h2 id="Omnibus-GitLabの設定"><a href="#Omnibus-GitLabの設定" class="headerlink" title="Omnibus GitLabの設定"></a>Omnibus GitLabの設定</h2><p>Omnibus版では設定を以下のファイルで行うようになっています。<br>gitlab.yamlやinitializerに記述していたものが一つのファイルにまとめられています。</p><figure class="highlight shell"><table><tr><td class="code"><pre><span class="line">/etc/gitlab/gitlab.rb</span><br></pre></td></tr></table></figure><h3 id="タイムゾーンの設定"><a href="#タイムゾーンの設定" class="headerlink" title="タイムゾーンの設定"></a>タイムゾーンの設定</h3><figure class="highlight ruby"><table><tr><td class="code"><pre><span class="line">gitlab_rails[<span class="string">&#x27;time_zone&#x27;</span>] = <span class="string">&#x27;Asia/Tokyo&#x27;</span></span><br></pre></td></tr></table></figure><h3 id="メールの設定"><a href="#メールの設定" class="headerlink" title="メールの設定"></a>メールの設定</h3><p>GitLabから送られるメールの設定です。</p><figure class="highlight ruby"><table><tr><td class="code"><pre><span class="line">gitlab_rails[<span class="string">&#x27;gitlab_email_from&#x27;</span>] = <span class="string">&#x27;gitlab@example.com&#x27;</span></span><br><span class="line">gitlab_rails[<span class="string">&#x27;gitlab_email_display_name&#x27;</span>] = <span class="string">&#x27;GitLab&#x27;</span></span><br></pre></td></tr></table></figure><h3 id="SMTP-設定"><a href="#SMTP-設定" class="headerlink" title="SMTP 設定"></a>SMTP 設定</h3><p>メールの環境に合わせて設定します。<br>Gmailなども設定できますが社内のSMTPサーバーを設定。</p><h3 id="設定が終わったら反映"><a href="#設定が終わったら反映" class="headerlink" title="設定が終わったら反映"></a>設定が終わったら反映</h3><p>設定を変更したら反映させます。</p><figure class="highlight shell"><table><tr><td class="code"><pre><span class="line">sudo gitlab-ctl reconfigure</span><br><span class="line">sudo gitlab-ctl restart</span><br></pre></td></tr></table></figure><h2 id="Non-omnibus-GitLabのバックアップ"><a href="#Non-omnibus-GitLabのバックアップ" class="headerlink" title="Non-omnibus GitLabのバックアップ"></a>Non-omnibus GitLabのバックアップ</h2><p>こちらは旧環境で行います。</p><figure class="highlight shell"><table><tr><td class="code"><pre><span class="line">sudo service gitlab stop</span><br><span class="line">cd /home/git/gitlab</span><br><span class="line">sudo -u git -H bundle exec rake gitlab:backup:create RAILS_ENV=production</span><br></pre></td></tr></table></figure><h2 id="DBダンプをMySQLからPostgreSQLに変換"><a href="#DBダンプをMySQLからPostgreSQLに変換" class="headerlink" title="DBダンプをMySQLからPostgreSQLに変換"></a>DBダンプをMySQLからPostgreSQLに変換</h2><p>Omnibus版はメインデータベースがPostgreSQLに変更されているので、MySQL &gt; PostgreSQLの変換が必要になります。これも公式の手順通りに進めればOK。</p><p><a href="https://gitlab.com/gitlab-org/gitlab-ce/blob/master/doc/update/mysql_to_postgresql.md#converting-a-gitlab-backup-file-from-mysql-to-postgres">https://gitlab.com/gitlab-org/gitlab-ce/blob/master/doc/update/mysql_to_postgresql.md#converting-a-gitlab-backup-file-from-mysql-to-postgres</a></p><p>この時点で移行用のバックアップデータが完成したことになります。</p><h2 id="バックアップデータの移行"><a href="#バックアップデータの移行" class="headerlink" title="バックアップデータの移行"></a>バックアップデータの移行</h2><p>作成したバックアップデータをOmnibus GitLabへ移行します。<br>例によって公式の手順通りでOK。</p><p><a href="https://gitlab.com/gitlab-org/omnibus-gitlab/blob/98b1bfb0d70082953d63abbc329cd6f2c628d3bc/README.md#restoring-an-application-backup">https://gitlab.com/gitlab-org/omnibus-gitlab/blob/98b1bfb0d70082953d63abbc329cd6f2c628d3bc/README.md#restoring-an-application-backup</a></p><figure class="highlight shell"><table><tr><td class="code"><pre><span class="line"><span class="meta prompt_"># </span><span class="language-bash">バックアップデータを所定の位置に配置</span></span><br><span class="line">sudo cp &lt;TIMESTAMP&gt;_gitlab_backup.tar /var/opt/gitlab/backups/</span><br><span class="line"><span class="meta prompt_"></span></span><br><span class="line"><span class="meta prompt_"># </span><span class="language-bash">unicorn と sidekiq の停止</span></span><br><span class="line">sudo gitlab-ctl stop unicorn</span><br><span class="line">sudo gitlab-ctl stop sidekiq</span><br><span class="line"><span class="meta prompt_"></span></span><br><span class="line"><span class="meta prompt_"># </span><span class="language-bash">バックアップデータをリストア</span></span><br><span class="line">sudo gitlab-rake gitlab:backup:restore BACKUP=&lt;TIMESTAMP&gt;</span><br><span class="line"><span class="meta prompt_"></span></span><br><span class="line"><span class="meta prompt_"># </span><span class="language-bash">GitLab 起動</span></span><br><span class="line">sudo gitlab-ctl start</span><br><span class="line"><span class="meta prompt_"></span></span><br><span class="line"><span class="meta prompt_"># </span><span class="language-bash">チェック</span></span><br><span class="line">sudo gitlab-rake gitlab:check</span><br></pre></td></tr></table></figure><h2 id="チェックでエラー発生"><a href="#チェックでエラー発生" class="headerlink" title="チェックでエラー発生"></a>チェックでエラー発生</h2><p>チェックかけたらリポジトリへのアクセス権がないと怒られたので修正します。</p><figure class="highlight shell"><table><tr><td class="code"><pre><span class="line">sudo chmod -R ug+rwX,o-rwx /var/opt/gitlab/git-data/repositories</span><br><span class="line">sudo chmod -R ug-s /var/opt/gitlab/git-data/repositories</span><br><span class="line">sudo find /var/opt/gitlab/git-data/repositories -type d -print0 | sudo xargs -0 chmod g+s</span><br></pre></td></tr></table></figure><p><code>find</code>コマンドは<code>sudo</code>してやらないと怒られるので注意。</p><h2 id="おわりに"><a href="#おわりに" class="headerlink" title="おわりに"></a>おわりに</h2><p>移行後にアクセスすると一回だけ502エラーが出てちょっと焦りましたが、<code>reconfigure </code>と<code>restart</code>したら直ったのでとりあえずOKです。バックアップ、リストア周りが優秀で予想以上に移行が簡単だったので自分の作るシステムもこうありたいと思いました。</p>]]></content>


    <summary type="html">&lt;p&gt;&lt;a href=&quot;https://about.gitlab.com/&quot;&gt;GitLab&lt;/a&gt;はその昔、手動でRailsやらMySQLやらRedisやらUnicornやらの環境を整えてソースから手動でインストールしなければなりませんでした。しかし最近はパッケージ化され&lt;cod</summary>


    <content src="https://rythgs.co/2015/omnibus_gitlab.png" type="image"/>


    <category term="gitlab" scheme="https://rythgs.co/tags/gitlab/"/>
    
    <category term="ubuntu" scheme="https://rythgs.co/tags/ubuntu/"/>
    
  </entry>
  
  <entry>
    <title>フォントサイズをデバイスごとにキレイに最適化する</title>
    <link href="https://rythgs.co/archives/2015/10/18/font-size-device-scaling/"/>
    <id>https://rythgs.co/archives/2015/10/18/font-size-device-scaling/</id>
    <published>2015-10-18T07:23:22.000Z</published>
    <updated>2022-09-02T09:33:10.719Z</updated>
    
    <content type="html"><![CDATA[<p>SASSの大改修に合わせてタイポグラフィの見直しを行いました。今まではモバイル、タブレットもfont-size、line-heightがデスクトップの設定で表示されていたので間抜けで見にくかったのです。モバイルでは表示領域が限られているので、個人的にフォントサイズは小さめ、行間は気持ち狭くが見やすい。せっかくVertical Rhythm、Modular Scaleを取り入れたので今回もこれらの原則に従って最適化します。</p><p><img src="/assets/img/2015/responsive.png" alt="Responsive"></p><p>ワンカラムなシンプルなサイトなので、メディアクエリーのブレークポイントのバリエーションは大・中・小の3つくらいでよいでしょう。それぞれモバイル、タブレット、デスクトップといったところでしょうか。</p><p>フォントサイズのベースを以下のように設定します。</p><table><thead><tr><th>Type</th><th>Font size</th></tr></thead><tbody><tr><td>Small</td><td>14px</td></tr><tr><td>medium</td><td>16px</td></tr><tr><td>Large</td><td>18px</td></tr></tbody></table><p>で、ブレークポイントをどこに置くかという問題ですが、主なフレームワークのブレークポイントを見ると、</p><table><thead><tr><th>フレームワーク</th><th>ブレークポイント</th></tr></thead><tbody><tr><td>Bootstrap</td><td>480px, 768x, 992px, 1200px</td></tr><tr><td>Skelton</td><td>400px, 550px, 750px, 1000px, 1200px</td></tr><tr><td>Foundation</td><td>640px, 1024px, 1440px, 1920px</td></tr></tbody></table><p>以上のようになっており、iPhone 6までのlandscapeが640pxで収まりiPadのlandscapeが1024pxで収まるFoundationのブレークポイントを参考にしたいと思います。 (iPhone 6+はタブレット寄りの考え。。)</p><figure class="highlight scss"><table><tr><td class="code"><pre><span class="line"><span class="selector-tag">html</span> &#123;</span><br><span class="line">  <span class="comment">// default</span></span><br><span class="line">  <span class="attribute">font-size</span>: <span class="number">100%</span>;</span><br><span class="line"></span><br><span class="line">  <span class="comment">// small</span></span><br><span class="line">  <span class="keyword">@media</span> <span class="keyword">only</span> screen <span class="keyword">and</span> (<span class="attribute">max-width</span>: <span class="number">40em</span>) &#123;</span><br><span class="line">    <span class="attribute">font-size</span>: <span class="number">87.5%</span>; <span class="comment">/* 14px / 16px * 100 */</span></span><br><span class="line">  &#125;</span><br><span class="line">  <span class="comment">// large</span></span><br><span class="line">  <span class="keyword">@media</span> <span class="keyword">only</span> screen <span class="keyword">and</span> (<span class="attribute">min-width</span>: <span class="number">64.063em</span>) &#123;</span><br><span class="line">    <span class="attribute">font-size</span>: <span class="number">112.5%</span>; <span class="comment">/* 18px / 16px * 100 */</span></span><br><span class="line">  &#125;</span><br><span class="line">&#125;</span><br></pre></td></tr></table></figure><p>Vertical Rhythm、Modular Scaleの基準はすべて1remを基準値としていたので、ルートのfont-sizeを変更するだけでマージンやパディングも含めてすべてうまい具合にスケーリングされます。便利ですね。remを使用しているのでIE8以下は死にますがハナから切り捨ててるのでこれでいいのです。</p><h2 id="参考"><a href="#参考" class="headerlink" title="参考"></a>参考</h2><ul><li><a href="http://foundation.zurb.com/docs/media-queries.html">Media Queries | Foundation Docs</a></li><li><a href="https://github.com/dhg/Skeleton/blob/master/css/skeleton.css#L395">Skeleton&#x2F;skeleton.css at master · dhg&#x2F;Skeleton · GitHub</a></li><li><a href="https://github.com/twbs/bootstrap/blob/v4-dev/scss/_variables.scss#L84">bootstrap&#x2F;_variables.scss at v4-dev · twbs&#x2F;bootstrap · GitHub</a></li><li><a href="http://bourbon.io/docs/#modular-scale">Bourbon - Documentation</a></li></ul>]]></content>


    <summary type="html">&lt;p&gt;SASSの大改修に合わせてタイポグラフィの見直しを行いました。今まではモバイル、タブレットもfont-size、line-heightがデスクトップの設定で表示されていたので間抜けで見にくかったのです。モバイルでは表示領域が限られているので、個人的にフォントサイズは小さめ、</summary>


    <content src="https://rythgs.co/2015/modular_scale.png" type="image"/>


    <category term="sass" scheme="https://rythgs.co/tags/sass/"/>
    
    <category term="design" scheme="https://rythgs.co/tags/design/"/>
    
  </entry>
  
</feed>